Using MudBox

In this lesson we started working with mudbox to practice creating detailed models.

we just messed around using the sculpting tools to create something that we liked. I created a dragon head. Here is what i have so far:

mud box 
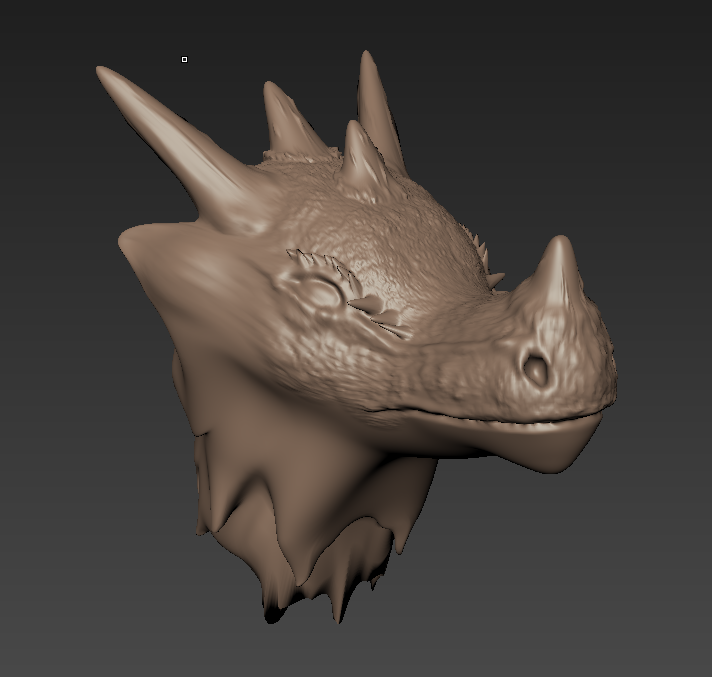
I started off with a sphere and used the grab tool to pull bits out to create the shape of the face. After that i pulled out the horns then used the sculpt and smooth tools to create the eyes and the mouth. I have now started to use the Imprint tool to add the effects of scales on to the model.

I really enjoyed Mudbox and once i got into the work flow and learned the tools i found it much easier to use than maya.

So far i think that the dragon is coming along quite nicely and i plan to continue working on it.


HighPoly-LowPoly Practice

High poly to low poly is where you will bake a detailed model into a model with less detail so that you have a nice looking object without all the poly count so you can have the object in a game without it crashing.

You do this by creating two of the same model. One with all your small details like scales on a lizard or holes in boxes. Then one with the main shape of what you want this one will need to be UV unwrapped. You will then place it within each other and Bake it.

So far i have created my less detailed box and one with the details on and i have unwrapped the less detailed one.

Here is what i have:

Normal mapping practice

Next lesson i will start with baking them together and start working on the normal map. I expect that when i bake this it will make the little holes and bits that stick out look like they are there even though they are not apart of the mesh its self.

Mocap work

Today I got to try motion capture for animation. I created a walk forward, from the side and from a corner. Then I created a idle, jump and a punch. Finally I created the one above which I started to make into an animation as you can see. When I put the reference into Motion builder it look like I had mostly stuck to the reference. But there are bits here and there that I need to tweak where the arms fade through the body, there is too slow movement or little jitters in the animation. I will keep working on it till it looks right.

Walk Cycle Finished- Batch Render To Come

Today I finished my walk cycle and started to render it out. I managed to finish the rendering by the end of the lesson but I didn’t managed to get it into premiere to combined the images into a well rendered video. in my own time I will get that finished and upload the finished render later on when it is finished. but n the mean time this is the finished piece not rendered.

walk cycle


Walk cycle peer review


Assessor name: Riley Foster

Your walk cycle is very nice and fluid! A lot of the joints on the model move smoothly and it mostly looks natural. The movements of the hips, knees and feet are the strongest points, as clearly a lot of effort went into the positioning and movement of them. I can see that thought went into the timing as well, as all of the limbs move at the same pace, which helps it in looking natural.

To improve on your animation you could make it more exaggerated. Perhaps add a bit of squash and stretch to the frames where the feet land on the floor, to add a little bit of a spring into the model’s step. You should also add some movement into the elbows, as they look very stiff and that takes away from it looking completely natural. Maybe you should have them sway a bit with every swing.


After I read the feed back I went and fixed my animation. I added more swing to the arms and more bounce in the steps to excaudate it more. I fixed the shoulder movements and hips movements. I then went and added some hand movement so that it would create more of an arc with the arms. Finally after that I went and added some swing in her pigtails to make her head bob more realistic.

Her is what I have so far:

Walk cycle update


Walk cycle continued

walk cycle 2

I have continued my work on my walk cycle and its getting there slowly.

I have added movement to the arms so that they are no longer stuck stiff in one position. I have also added some movement to her hips and shoulders so that there is more bounce in the walk.

I had some problems with the legs which made the walk look unnatural. to fix this I had to rotate the  knees outward a few inches. I haven’t fixed this completely yet but that’s what i’m planning to work on next lesson. I have also started on the head movement to make it bob when walking.

Textured Scythe And Shield


Today, I continued on texturing my scythe and shields in substance painter. above you can see some finished renders of them.

On the scythe I had almost finished it last lesson so I just had to add the hand grip to it with I used a wool fibre texture to make it look like a cloth grip.

The with the shields I just started them this lesson so I made the main body of the shields the same colour as the blade, same goes for the centre (but without the fibre texture) and the bits on the side. on the back of the shields there were straps that are put around the arm so I found a texture of leather and worked with it till it look like it would go with the shield.

Walk Cycle


These two videos are of walk cycles but one being of a real person and one of an animated one. These are there for reference in making my own walk cycle. The real life one helps because I can watch it and get an idea of the timing and movements for the walk. Then the animated one helps because its exaggerated and it could help me get an Idea of how far I could stretch the exaggeration.

walk cycle 1

Here is my walk cycle so far. So far I have only finished the leg movement and the basics of the first frame. I need to next work on the hips swaying, arms swinging and the shoulder movements as all of these things contribute to the overall look of the walk. At the moment I’m pretty happy how it is at this point.

It was Pretty confusing at first trying to find where the feet were meant to be placed however after the first two frames it got easier and I got better at animating it.

Scythe in substance painter

substance paint scythe 1

Today I started painting my scythe in substance painter and so far I have almost completed painting the basic colours onto it. Once I have finished painting to basics on I can then start to add detail onto it such as scratches and stains to make the blade look a bit used. All I have to do before adding the detail is the hand grip and clean-ups on places where the paint might have been misplaced.

so far I am liking how it is turning out especially the way it is starting to look more realistic but still stylised. After I finish the scythe I then can move onto the shields.